Test editor introduction
With the test editor you can build tests, questionnaires, exams and basically anything where someone has to answer questions.
Some of the features of the test editor are :
- Define questions for your test
- Pagination for your questions
- Provide test catalog information and copyrights
- Progressive complexity enablement based on the features of your test
You can build your own tests. You cannot view or change the tests that are stored centrally in the ITR system.
To access the test editor you will need to have the right as Test author.
- Open the ITR menu, access Test and Reports and select the menu item "Edit test definitions".
- The list of tests will appear. Select the test you want to change or add a new test.
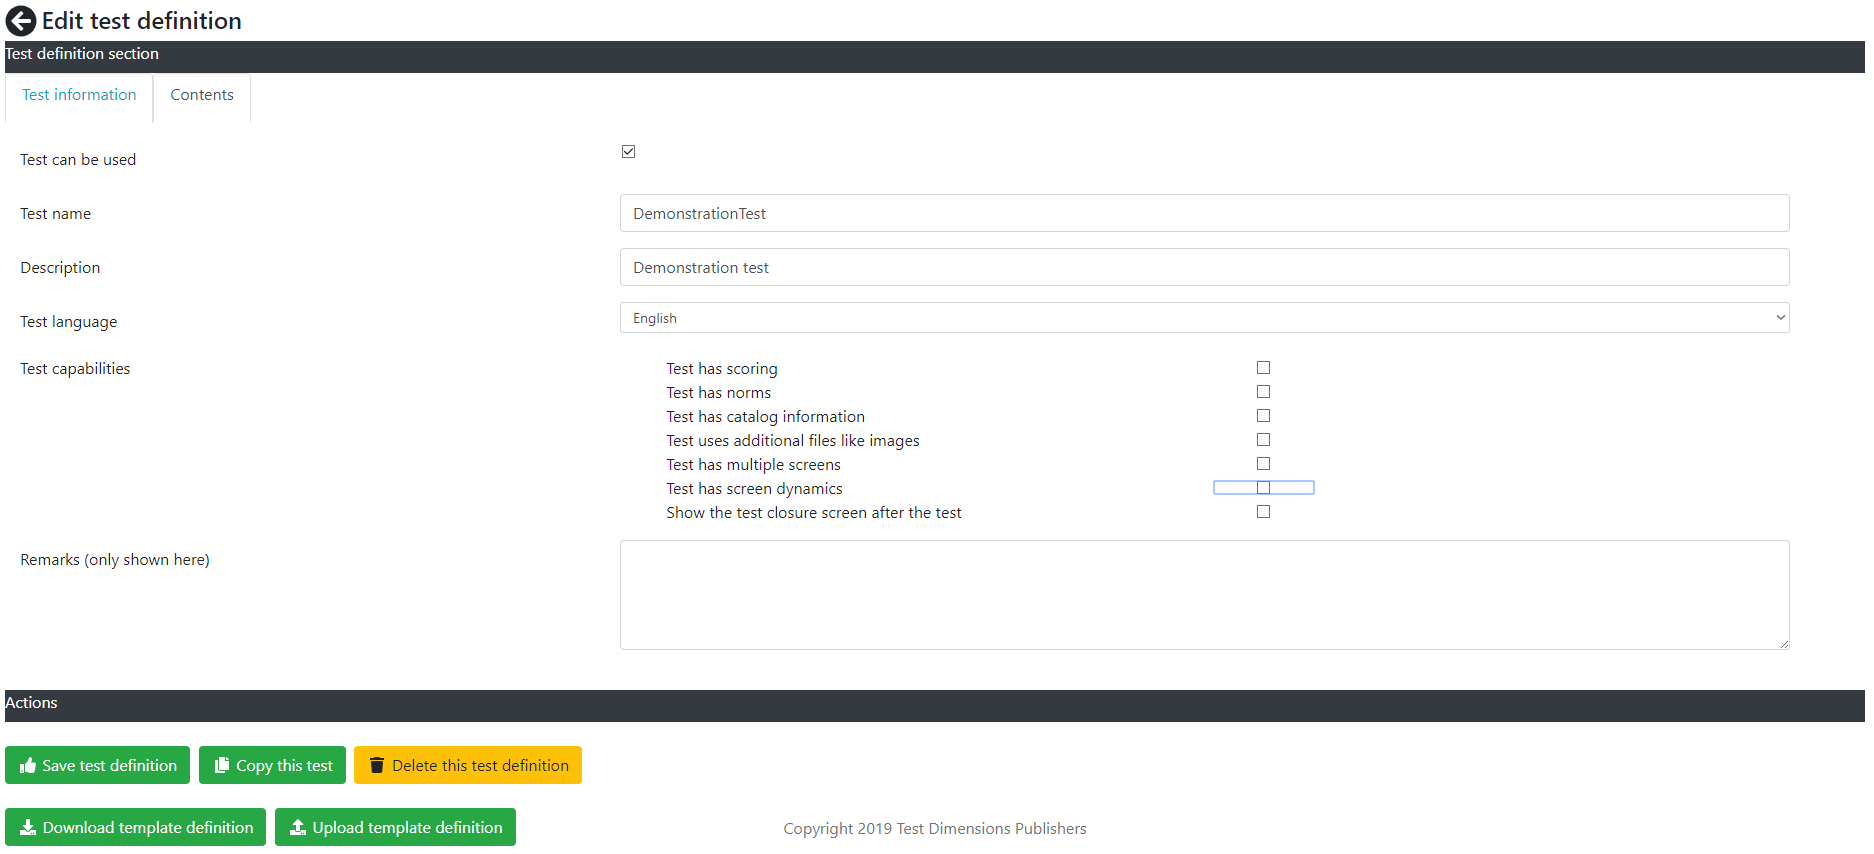
You will and up in the "Test editor" screen. The screen looks like this for a test that does not use any special test capabilities.
If you add a test capability the screen will change and show the options required for this test capability. This is called progressive complexity enablement, which means that you will only need to learn the features that you will use.
The basic test screen without any options has the following fields.
- Test can be used; If checked the test can be use by your company. If you also want to the to be available to other companies on your server then you will need to publish the test.
- Test name; The name of the test.
- Description; A description of the test
- Test language; Set the language of the test
- Test capabilities; set the capabilities of the test
- Test has scoring; check this if your test needs to provide a numeric result for how well the test is done of for some other purpose. You can use one scale for scoring your test, or many. This is supported by the ITR.
- Test has norms; check this if your test has a norms table. Scoring the test results in a number, or more in case you use multiple scales. A norm will plot the score against a reference group.
- Test has catalog information; if you want to set catalog information or test costs (in case you want people to pay for your test) then switch this on
- Test uses additional files like images; if your test has images you want to use then check this and you will be able to up/download media files.
- Test has multiple screens; most surveys or simple questionnaires are simply a list of questions. More complex tests, like psychological tests, often have multiple screens so that the person taking the test focusses on that specific question only. To enable multiple screens check this box
- Test has screen dynamics; when your test has screen dynamics parts of the screen can be shown or hidden depending on answer the person taking the test gives. This is called screen dynamics. You can also use screen dynamics in a test with multiple screens to build an adaptive test, using advanced pre - and post screen scripts.
- Please note that if you have used the feature for for example screen dynamics in your test then switching it off in the test editor does not remove all related features. You simply will not see them anymore in the editor.
- Remove the test scoring & norms during test taking; this setting is checked by default. When checked the ITS will *NOT* download the test scoring information and the norm information to the web browser of the candidate. This could disclose how the test is scored and normed, which might be used by a skilled candidate to determine the correct answers to the test.
- Show the test closure screen after the test; check this to show the generic test closure screen after the test.
- Remarks; remarks you might have about this test. Normally only shown in the test editor.
Buttons in this screen are the following.
- Save test definition; save the test definition
- Copy this test; copies this test to a new test definition. Immediately change the name after copying.
- Delete this test definition; delete this test definition. Removing a test is irreversible. Sessions using this test will be corrupted. Use with care.
- Download template definition; download the test definitions as a .itrtesttemplate file. Please note that any test images or media files are part of the definition. Uploading a test definition will also update all files.
- Upload template definition; upload the test definition from a .itrtesttemplate file.
In the rest of the explanation of the test screen it is assumed that ALL options are switched on. If you would have switched on all option the Test Information tab would have presented the following additional fields.
- Copyrights; set copyrights information for this test
- Test costs (in credit units); specify the price of this test in credit units
- Explanation; the explanation for the test catalog
Screens tab
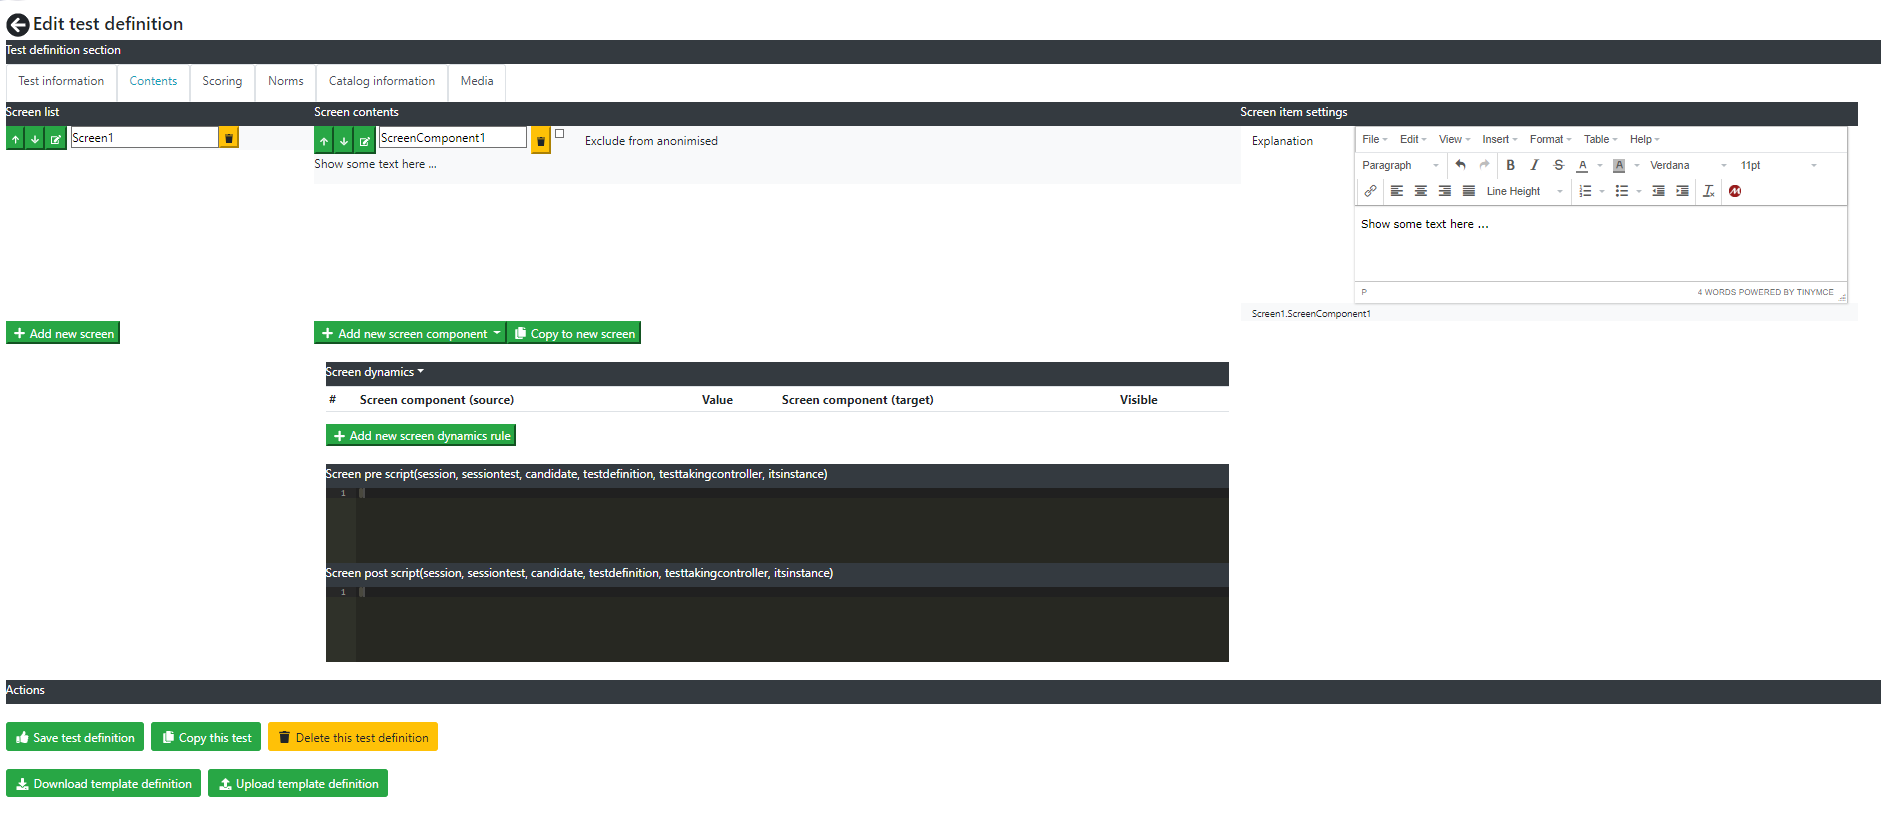
In this screen a question has been created with a simple explanation. This has been done to show all buttons and options.
The screen has 3 columns
- screen list; shows the list of screens in case your test has multiple
- screen contents; the contents of the screen
- screen item settings; if a component in the screen contents is selected then the settings can be edited in this column (in this example this is the Explanation). The settings are available depend on the selected screen component.
The buttons have the following functionalities. Screen list row
- Add new screen; adds a new screen. The screen description can be changed to anything you like as long as it is unique. For example : Question1. The following buttons are available.
- Up button; move this component up in the list
- Down button; move down
- Edit button; click to edit the components in this screen
- Garbage can; delete this screen
Screen contents row
- Add new screen component; add a new screen component to the currently selected screen. Select one from the list. THe name of the screen component can be changed to whatever you like. For example : Answer. The following buttons are available on the screen component.
- Up button; move this component up in the list
- Down button; move down
- Edit button; To edit what is shown in this component press the edit button
- Garbage can; delete this screen component
- Exclude from anonimised; check this if this answer needs to be excluded from the anonimised data gathering. For example if you ask the name of the physician of somebody then this is personal information that should be removed from an anonimised dataset.
- Store at session level; normally answers to questions are stored inside the test. You may choose to re-use test answers in a test session by storing them at the session level. The answers will still be stored in the test the candidate has entered them so you will be able to view them for research purposes. But they will also be stored with the test session. In another test you can copy them in in a test question (so the user does not have to enter them again) or skip a screen or score the test or do something else.
- Copy to new screen; copy this screen to a new screen
- Add new screen dynamics rule; Add a new screen dynamics rule. Screen dynamics rules can only be set if there are at least two components in your screen. The following information can be set.
- Screen component source; select the source of the information that will switch some other screen component on or off. This can be a component on a different screen.
- Value; the value of the screen component the person taking the test has filled in
- Screen component target; The screen component that needs to be shown or hidden
- Visible; Check if this component needs to be shown, uncheck to hide
- Up button; move rule up
- DOwn buttons; move rule down
- Garbage can; delete this rule
- screen pre and post script; for very complex use cases a script can be set. Mostly for cases like adaptive tests, where parts of the test are switched on or off depending on the results filled in by the person taking the test so far.
Screen item settings The screen item settings depend fully on the selected screen templates.
Scoring tab
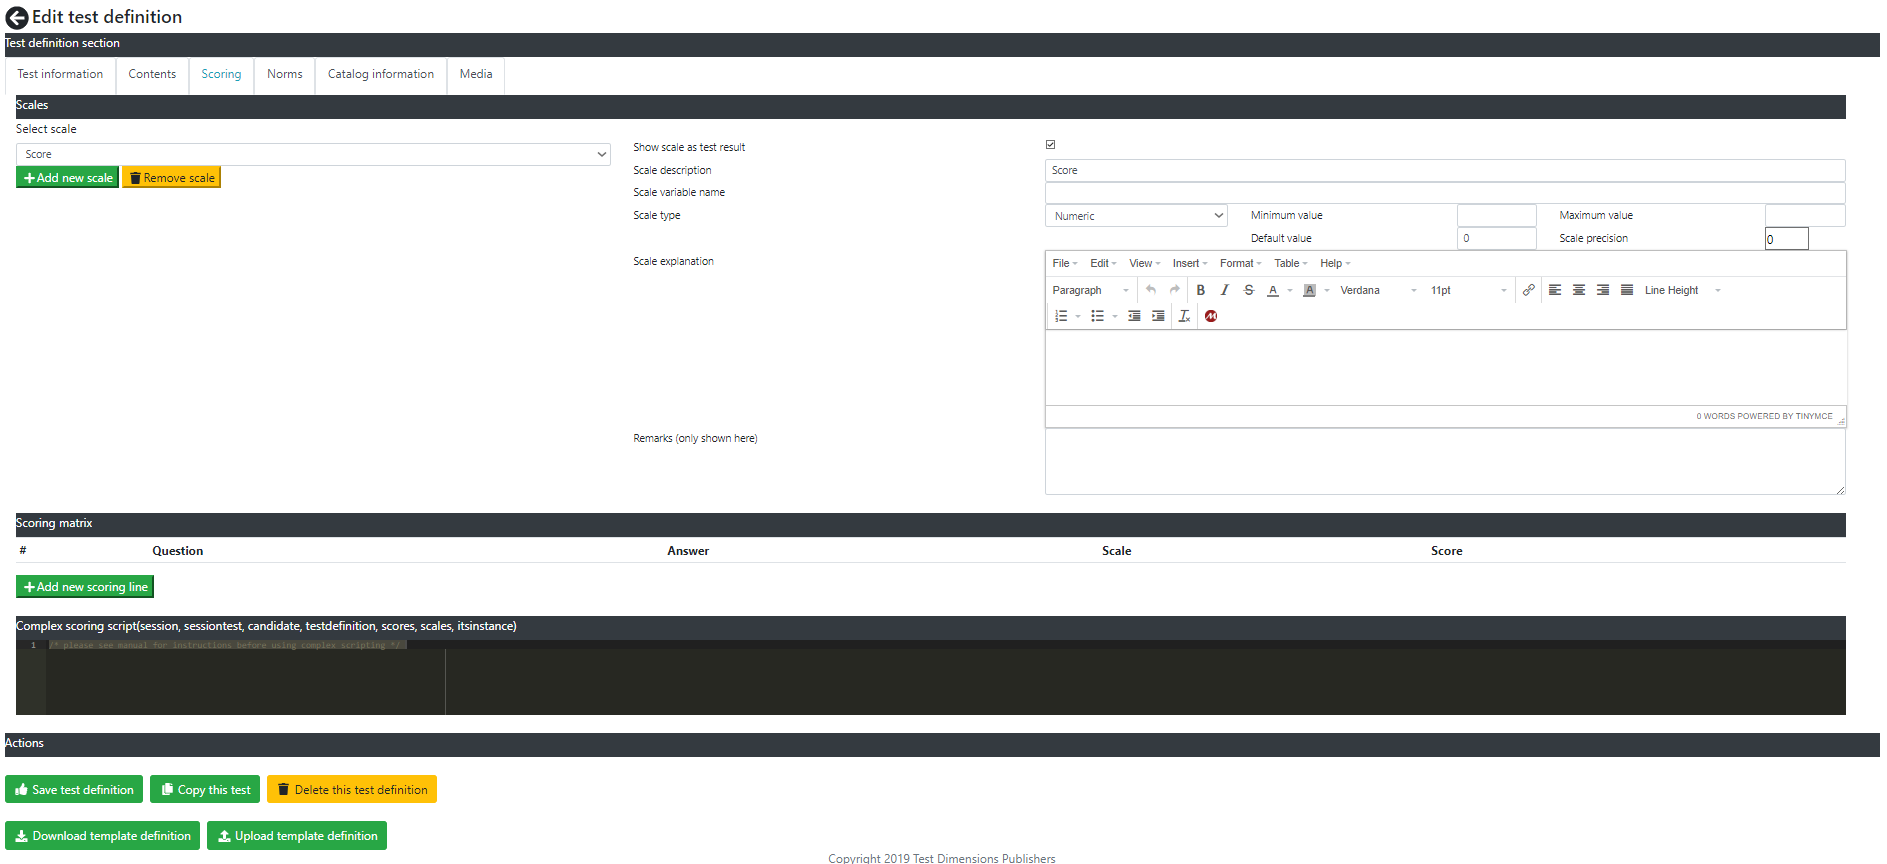
The following buttons and information can be used on this screen (from top to right).
- Select scale; in case you have multiple scales you can select the correct scale here
- Add new scale; add a new scale
- Remove scale; removes the currently selected scale
- Show scale as test result; check this to make this scale visible in the test results
- Scale description; description of this scale
- Scale variable name; variable name used for scale calculations and referencing this scale from scripts and such.
- Scale type; Numeric or textual. Textual scales have results like : low, high, passed, failed et cetera.
- Minimum value; only for numeric scales. The minimum value for this scale
- Maximum value; only for numeric scales. The maximum value for this scale
- default value; the default value for this scale
- Scale precision; precision for this scale. For example when the precision is 0 the scale is rounded to a whole number, like 54. When precision is 1 it can be 54.5, when precision is 2 it is rounded to 54.53 and so forth
- Scale explanation; explanation about this scale
- Remarks; remarks about this scale
Section scoring matrix
- button Add new scoring line; adds a new scoring line to relate answers given to scores on a test. When pressed a line is added with the following fields.
- Question; here you can select the question
- Answer; the answer given as a number. For any answer use the value : %%QuestionValue%%
- Scale; the scale you would like to add or delete a number to. To use the answer given as a nunber to add use : %%QuestionValue%%
- buttons up, down and delete. Move the rule up, down or delete the rule
- Complex scoring script; in case you would like to use a Javascript for scoring you can enter it here
Norms tab
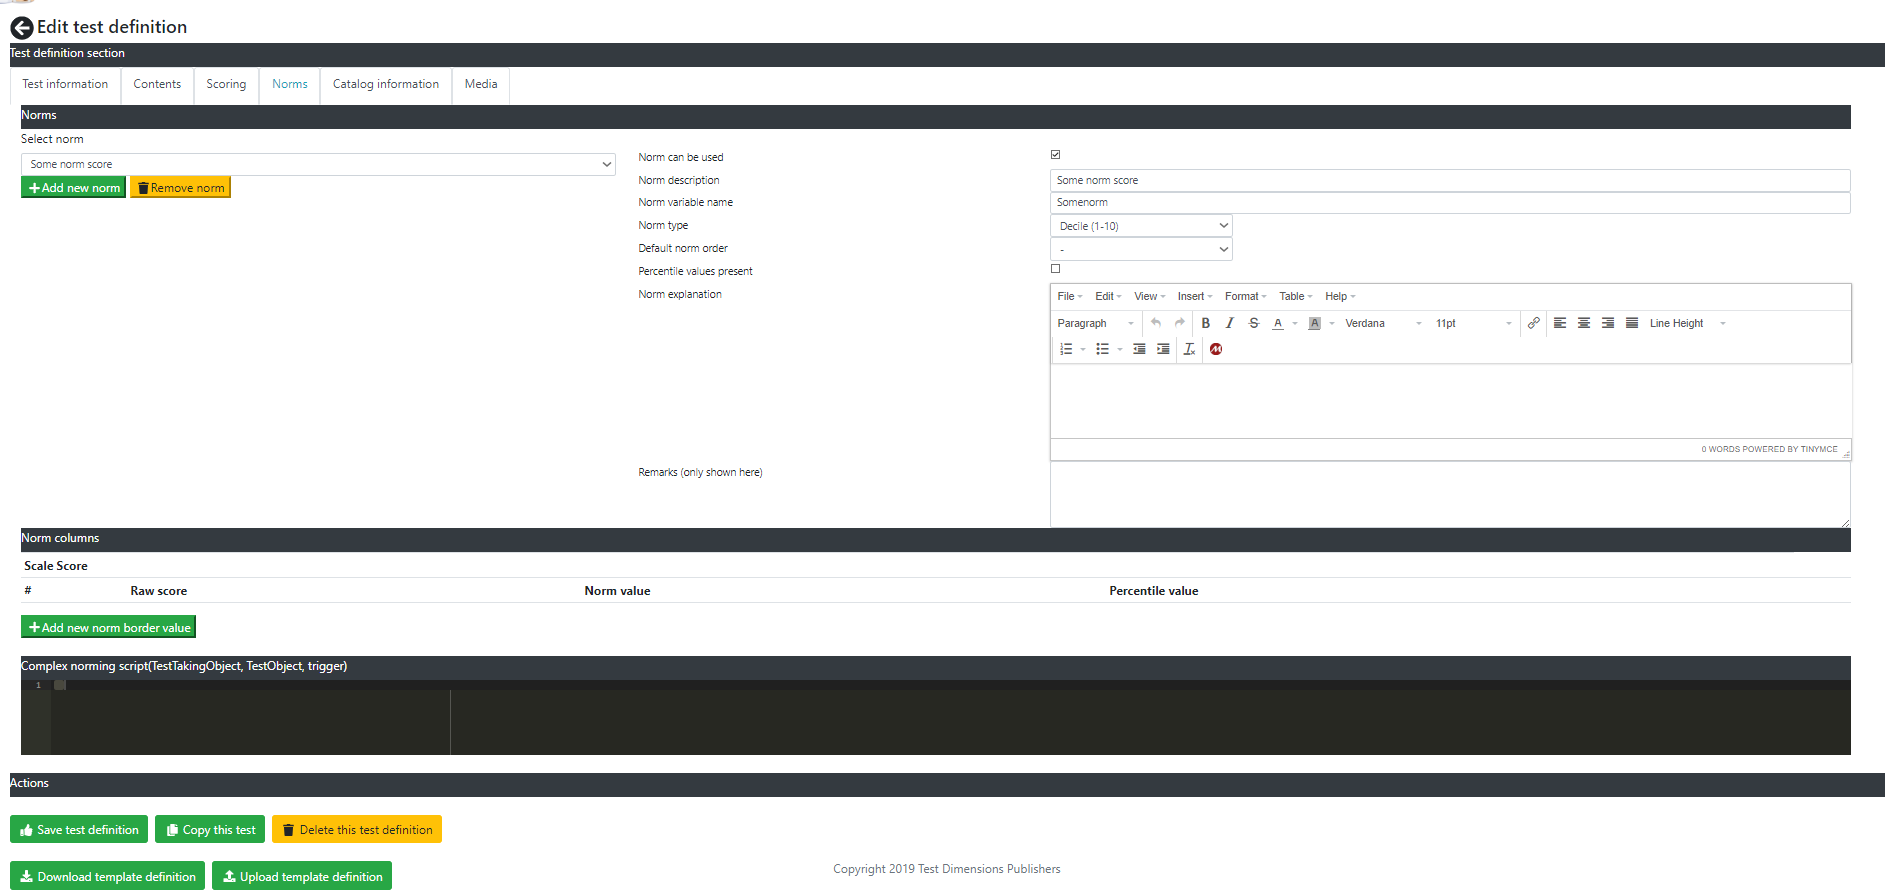
The following buttons and information can be used on this screen (from top to right).
- Select norm; in case you have multiple norms you can select the desired norm here
- Add new norm; add a new norm
- Remove norm; removes the currently selected norm
- Norm can be used; Check this if you want consultants to be able to use this norm
- Norm description; description of this norm
- Norm variable name; the variable name for this norm used in scripting
- Norm type; Stanine, decile, vigintile, or percentile. You can also make a textual norm (values that are often used are low score, medium score, high score)
- Default norm order; in case this is a default norm for this test then specify whether this is the first, 2nd or 3rd default norm
- Percentile values present; to make norms comparable you can convert them to a percentile value. If you enter the percentile value then you will be able to compare a textual norm result, with a stanine norm result and a vigintile norm result.
- Norm explanation; explanation about this norm.
- Remarks; remarks about this norm
Norm columns section This section is repeated for each scale in the test.
- Add new norm border value; Adds a new norm border value row. The following columns will be available.
- Raw score; any value up to and including this border value will receive the norm value
- Norm value; the norm value for this norm
- Percentile value; the percentile norm result
- buttons up, down and delete. Move the rule up, down or delete the rule
- Complex norming script; in case you would like to use a Javascript for scoring you can enter it here
Catalog tab
In this catalog tab you can enter one field, catalog information, which will be shown in the test catalog.
Media tab
On this tab you can upload and download available media files.
Section Test media
- Upload file button; press this button and upload any file you like. Upload file size is mostly limited to about 10 Mbyte maximum file size. Videos should not be uploaded to the ITR, but linked from for example vimeo or youtube. The file will show up as available media file in the list.
- The file name is for reference purposes only.
- The file link can be used as described below.
- Garbage button; delete the file
- download button; download the file
Section Catalog media
- Upload file button; press this button and upload a PDF file. Upload file size is mostly limited to about 10 Mbyte maximum file size. The file will show up as available media file in the list.
- The file name is for reference purposes only.
- The file link can be used as described below.
- Garbage button; delete the file
- download button; download the file
Insert the File link as a source for an image (available in the HTML editor for example) and you will see this file in the screen contents on the Contents tab of your test. You can do the same in the test catalog. You can also use the File link for a URL download link (for example for the catalog media PDF files in the catalog information tab).


